note1: DDR2 is ESD sencitive, better to use hot air solder without touch
note2: in order to increase antenna sencitive, RF parts change to 0201.
| Details | |
|---|---|
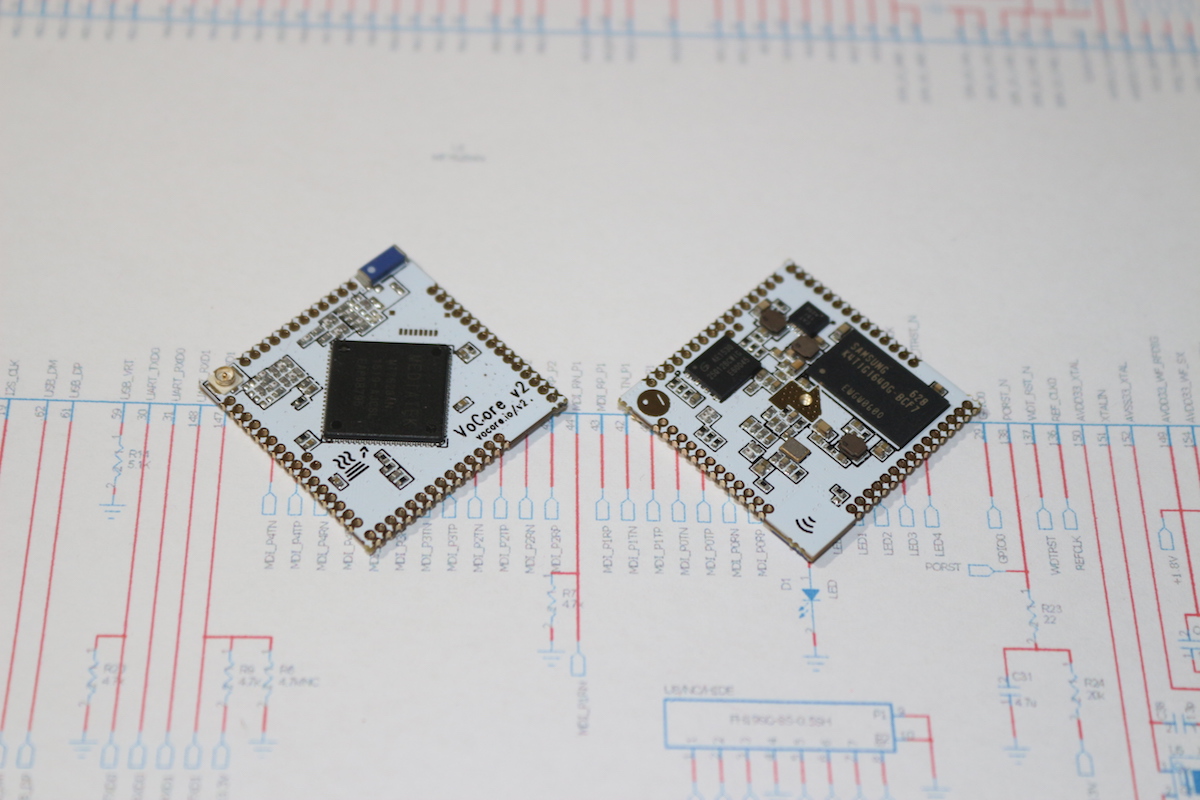
| SIZE | 25.6mm x 25.6mm x 3.0mm |
| CPU | MT7628, 580 MHz, MIPS 24K |
| MEMORY | 128MB, DDR2, 166MHz |
| STORAGE | 16M NOR on board, support SDXC up to 2TB |
| WIRELESS | 802.11n, 2T2R, speed up to 300Mbps. |
| ANTENNA | One U.FL slot, one on board antenna. |
| ETHERNET | 1 port/5 ports, up to 100Mbps. |
| USB | Support USB 2.0(host only), up to 480MBit/s. |
| GPIO | around 40 (pinmux) |
| UART | x3 (UART2 for debug console) |
| PWM | x4 |
| PCIe(option) | x1(option) |
| TEMPERATURE | 0C ~ 40C(full load) or -10C ~ 70C |
| POWER SUPPLY | 3.6V ~ 5.5V, 500mA |
| POWER CONSUMPTION | 74mA wifi standby, 230mA wifi full speed, 5V input. |
| LOGIC LEVEL | all logic pins are 3.3V, current 4mA/8mA |
20240101:
1. update 16MB NOR flash to 32MB, firmware patch required for openwrt 18.06, link here
20230705:
1. uboot change uart speed to match linux driver.
2. rf circuit change to 0201 instead of 0402 for better signal.
3. solder mask color change to green from white.
4. change NOR flash package from WSON6x5 to WSON8x6.
PCB&SCH: Download md5:882079c4bf94b5f27e0769a553bdb670
Symbol and Model(KiCAD7): Download
OpenWrt Source Code: Download
UBoot: Download
WiFi Driver: Download (Github) support latest openwrt
3D Model(.step): Link
note: normally, we upgrade or fix brick are using Firmware. Flash Image is a clone of the full flash, for professional usage only.
Firmware Patch: Download
note: screen driver can be change at /lib/modules/4.14.*/fbusb.ko
Firmware(DDR128,NOR16/32,OpenWrt 23.05.2): Download
Flash Image: Download md5:f4c527a1e563d0ad7ef9ab0b5e0b35c6
UBoot(128MB): Download md5:69335f57c44bb6d7c6901c260689cc94
UBoot(64MB): Download md5:2f00b3029f60df99f926781b582f9a35
Datasheet: Download
FCC: 2AC4RVOCOREV2
ROHS: Download
note: To get toolchain, please check github.com/vonger/vocore2, after compile openwrt you will get it.
VoCore2 + Dock Ultimate version makes it easy to use.
VoCore Camera Tiny camera supports h264 + microphone.
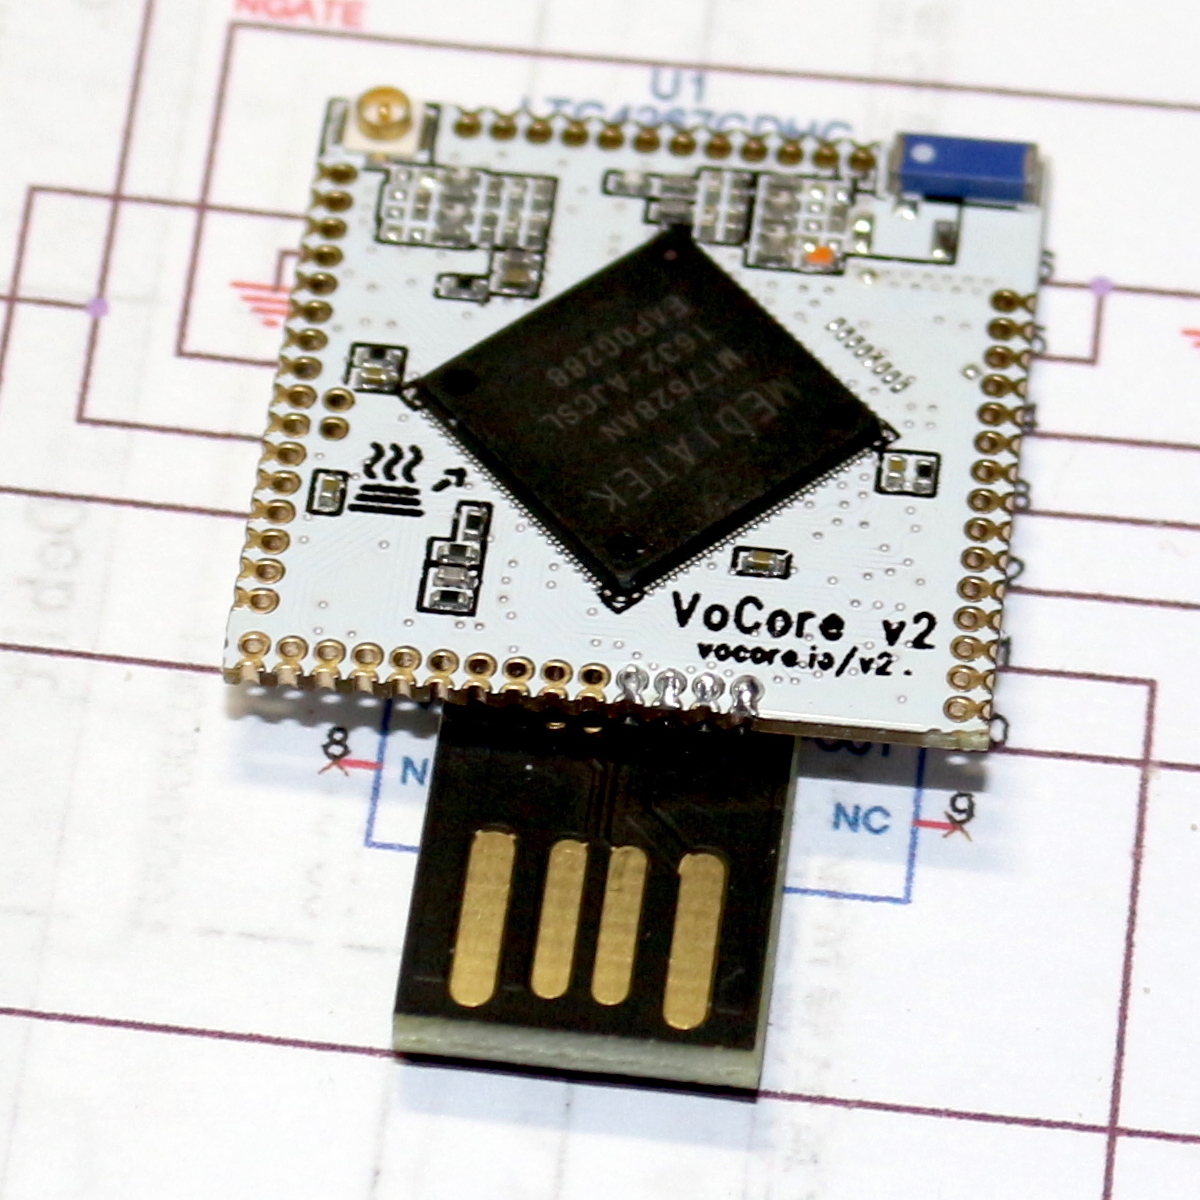
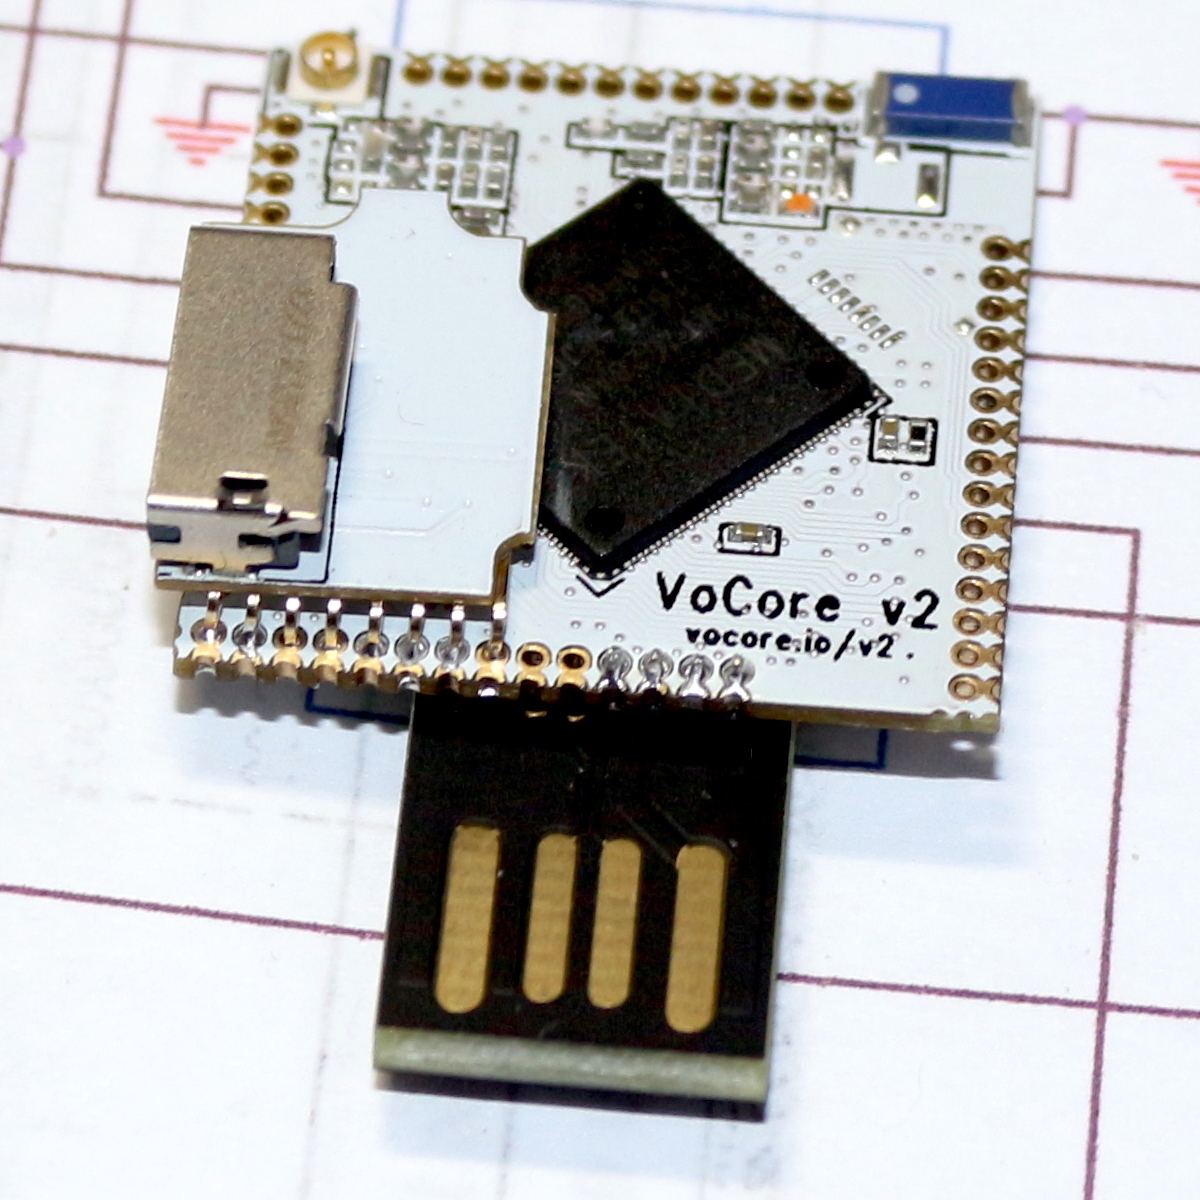
VoCore2 is a successor of VoCore, make it more fast, stable, but still same size.

| Left | Name | Mux | Note |
|---|---|---|---|
| - | +3.3VO | +3.3V output | max output current 100mA |
| 30 | TXD0 | GPIO12, UART0 Lite TXD | pull down to GND, Test/Normal mode pin. |
| 31 | RXD0 | GPIO13, UART0 Lite RXD | 3.3V |
| 29 | REFCLK | GPIO11, reference clock, SDXC CLK* | |
| 33 | P0RP | 10/100 PHY Port #0 RXP | |
| 34 | P0RN | 10/100 PHY Port #0 RXN | |
| 35 | P0TP | 10/100 PHY Port #0 TXP | |
| 36 | P0TN | 10/100 PHY Port #0 TXN | |
| 43 | PWM1 | 10/100 PHY Port #1 TXN, GPIO15, PWM Channel, SPI Slave Clock | Second Column |
| 44 | PWM0 | 10/100 PHY Port #1 TXP, GPIO14, PWM Channel, SPI Slave Chip Select | Second Column |
| 40 | RXD2 | 10/100 PHY Port #1 RXN, GPIO17, UART2 Lite RXD, SPI Slave MOSI | 4.7K pull down to GND |
| 42 | TXD2 | 10/100 PHY Port #1 RXP, GPIO16, UART2 Lite TXD, SPI Slave MISO | |
| 45 | P2RP | 10/100 PHY Port #2 RXP, GPIO18, PWM Channel | |
| 46 | P2RN | 10/100 PHY Port #2 RXN, GPIO19, PWM Channel | |
| 47 | P2TP | 10/100 PHY Port #2 TXP, GPIO20, PWM Channel | |
| 48 | P2TN | 10/100 PHY Port #2 TXN, GPIO21, PWM Channel | |
| 49 | SD WP | GPIO22, 10/100 PHY Port #3 TXP, SDXC WP | |
| 50 | SD CD | GPIO23, 10/100 PHY Port #3 TXN, SDXC CD |
| Top | Name | Mux | Note |
|---|---|---|---|
| - | GND | Groud | |
| 28 | SPI CS0 | SPI Master Chip Select 0 | 4.7K pull up to 3.3V |
| 25 | SPI CLK | SPI Master Clock | 4.7K pull up to 3.3V |
| 26 | SPI MISO | SPI Master In Slave Out | |
| 27 | SPI MOSI | SPI Master Out Slave In | 4.7K pull down to GND |
| 24 | SPI CS1 | SPI Master Chip Select 1 | 4.7K pull down to GND |
| 21 | I2C SD | GPIO5, I2C Data, SDXC D2* | 4.7K pull up to 3.3V |
| 20 | I2C CLK | GPIO4, I2C Clock, SDXC D3* | 4.7K pull up to 3.3V |
| 19 | I2S CLK | GPIO3, I2S Bit Clock, SDXC CMD* | |
| 18 | I2S WS | GPIO2, I2S L/R Clock, SDXC D0* | |
| 16 | I2S SDI | GPIO0, I2S Data In, SDXC D1* | |
| 17 | I2S SDO | GPIO1, I2S Data Out | 4.7K pull down to GND |
| Right | Name | Mux | Note |
|---|---|---|---|
| - | GND | Ground | |
| 148 | RXD1 | GPIO12, UART1 Lite RXD | |
| 147 | TXD1 | GPIO13, UART1 Lite TXD | pull up to 3.3V, GPIO/JTAG mode pin |
| 141 | GPIO41 | GPIO41, JTAG TMS | JTAG needs 10K pull up, R9 -> R6 |
| 140 | GPIO40 | GPIO40, JTAG Clock | JTAG needs 10K pull up, R9 -> R6 |
| 139 | GPIO39 | GPIO39, JTAG Reset | JTAG needs 10K pull up, R9 -> R6 |
| 143 | GPIO43 | GPIO43, JTAG TDO | JTAG needs 10K pull up, R9 -> R6 |
| 142 | GPIO42 | GPIO42, JTAG TDI | JTAG needs 10K pull up, R9 -> R6 |
| 138 | RST | Reset, touch GND to reset | |
| 137 | GPIO38 | GPIO38 | |
| 136 | GPIO37 | GPIO37 | |
| - | +3.3VO | +3.3V output | max output current 100mA |
| - | GND | Ground | |
| - | GND | Ground | |
| - | +1.8VO | +1.8V output | max output current 100mA |
| Bottom | Name | Mux | Note |
|---|---|---|---|
| - | GND | Ground | |
| 51 | SD D1 | GPIO24, 10/100 PHY Port #3 RXP, SDXC D1 | |
| 52 | SD D0 | GPIO25, 10/100 PHY Port #3 RXN, SDXC D0 | |
| 54 | SD CLK | GPIO26, 10/100 PHY Port #4 RXP, SDXC CLK | |
| 55 | SD CMD | GPIO27, 10/100 PHY Port #4 RXN, SDXC CMD | |
| 56 | SD D3 | GPIO28, 10/100 PHY Port #4 TXP, SDXC D3 | |
| 57 | SD D2 | GPIO29, 10/100 PHY Port #4 TXN, SDXC D2 | |
| - | +3.3VO | +3.3V output | max output current 100mA |
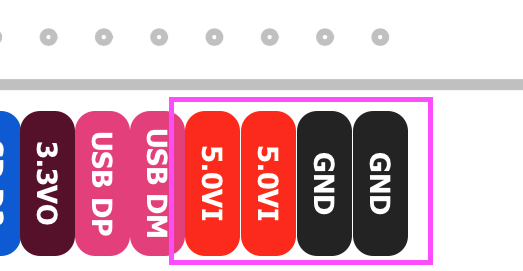
| 61 | USB DP | USB2.0 Data+ | |
| 62 | USB DM | USB2.0 Data- | |
| - | +5.0VI | +5.0V input | min input current 500mA |
| - | +5.0VI | +5.0V input | min input current 500mA |
| - | GND | Ground | |
| - | GND | Ground |
| Middle | Name | Mux | Note |
|---|---|---|---|
| 133 | PCI CKP | PCI Express External Reference Clock Output+ | |
| 132 | PCI CKN | PCI Express External Reference Clock Output- | |
| 130 | PCI RXN | PCI Express Differential Receiver RX- | |
| 129 | PCI RXP | PCI Express Differential Receiver RX+ | |
| - | GND | Ground | |
| 127 | PCI TXP | PCI Express Differential Transmit TX+ | |
| 126 | PCI TXN | PCI Express Differential Transmit TX- | |
| 135 | PCI RST | PCI Express Device Reset |
* five ethernet ports mode, sdcard mux to i2s/i2c.
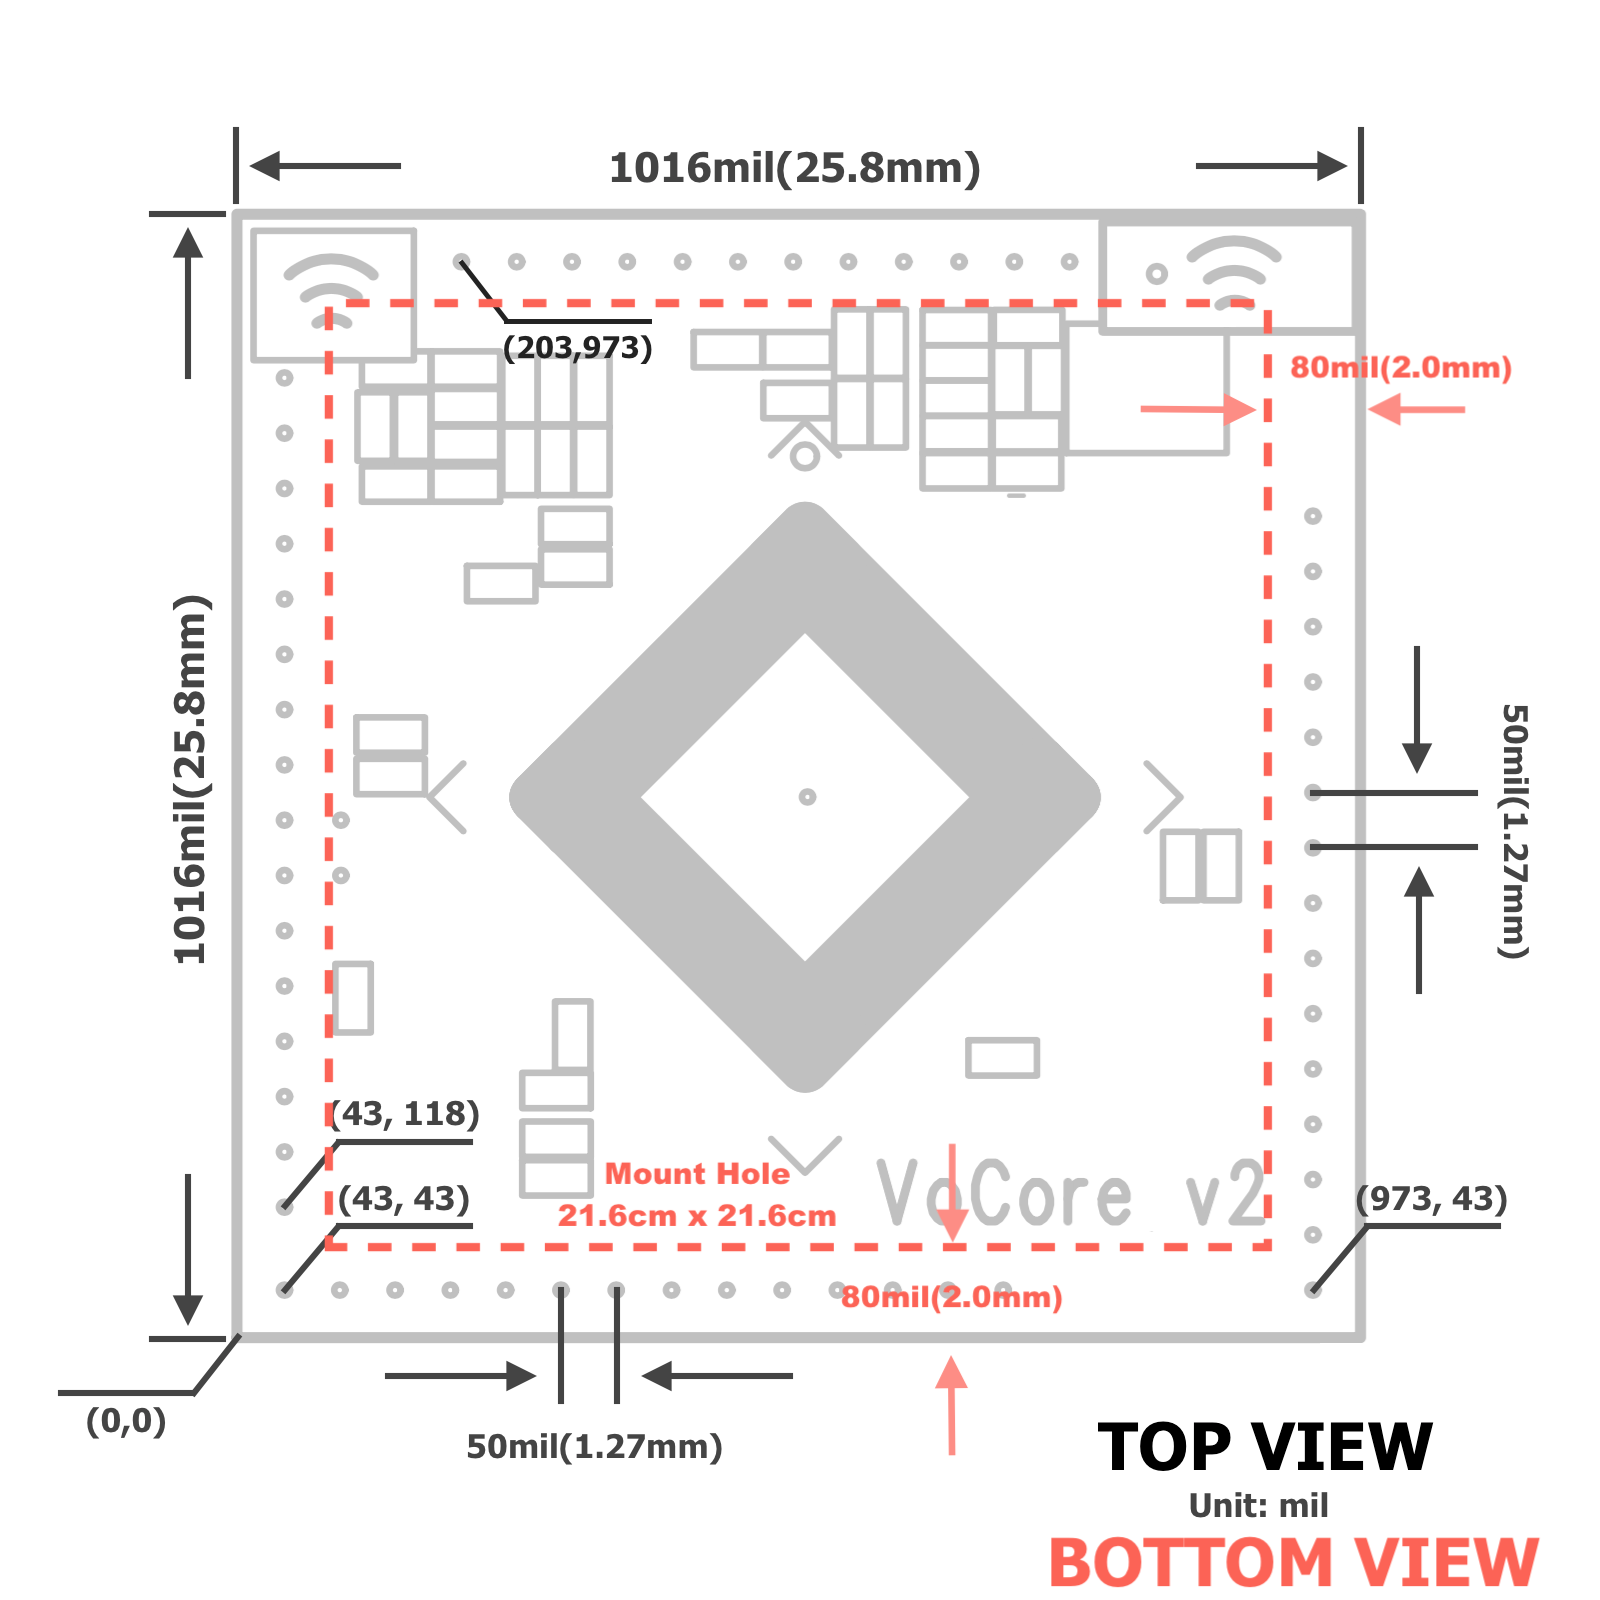
* hole diameter is 0.6mm.
GIF: fast power up with USB cable Link
1. connect to 3.6V~6.0V and GND with a stable power source, such as USB charger.
note: be careful, high voltage will damage your VoCore.
2. if everything works, after 30 seconds, you will find VoCore2 in your computer hotspot list.
3. connect to VoCore2 hotspot.
4.a using ssh or putty or similar tools login to VoCore2(root/vocore).
4.b using USB2TTL, please check "Connect to VoCore through USB2TTL" section.
important : UART speed is 115200bps, 8bits, no even, 1 stop bit
video tutorial: youtube
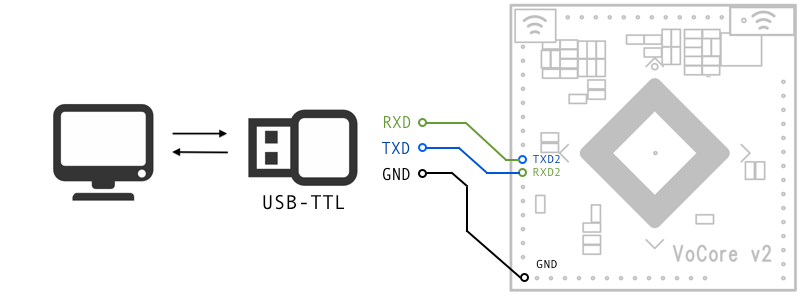
1. connect USB2TTL.TXD to VoCore2.RXD2, USB2TTL.RXD to VoCore2.TXD2, USB2TTL.GND to VoCore2.GND.
2. setup your serial application(such as putty/teraterm for windows, kermit for mac,linux) in your computer to 115200bps, 8 data bits, no even, 1 stop bit.
3. power on your VoCore2, now you should find some text output.
This tutorial is for firmware 20190316(default) or later which based on openwrt 18.06.2.
tutorial please check at Beginner: OpenWrt 18.06 stable version
This tutorial is for firmware 20170527(obsoleted) which based on openwrt cc.
note: please upgrade your firmware to 20190316 or later version, this version is out of date.
video tutorial(require USB2TTL): youtube
1. connect to your VoCore through USB2TTL.
2. run command in console(UART console).
3. setup network to enable dhcp(get ip from your hotspot).
uci delete network.wwan
uci set network.wwan=interface
uci set network.wwan.proto=dhcp
uci commit
4. setup firewall to enable access to internet through your hotspot.
uci del_list firewall.@zone[1].network=wwan
uci add_list firewall.@zone[1].network=wwan
uci set firewall.@zone[1].input=ACCEPT
uci set firewall.@zone[1].output=ACCEPT
uci set firewall.@zone[1].forward=ACCEPT
uci set firewall.@zone[1].masq=1
uci set firewall.@zone[1].mtu_fix=1
uci commit
5. setup wireless to enable ap+sta mode.
uci set wireless.sta.ssid="[TARGET AP SSID]"
uci set wireless.sta.key="[TARGET AP PASSWORD]"
uci set wireless.sta.network=wwan
uci set wireless.sta.disabled=0
uci commit
note:replace [TARGET AP SSID] to the target ap ssid you want to connect to, [TARGET AP PASSWORD] is its password.
5. restart your network, it will work.
/etc/init.d/network restart
6.(option) once ap+sta is totally up, disable it in config, so if next time your target ap is missing, you still able to connect to VoCore2.
uci set wireless.sta.disabled=0
uci commit
/etc/init.d/network restart
sleep 10
uci set wireless.sta.disabled=1
uci commit
note: better copy the three lines to /etc/rc.local
1. download the latest firmware(not the flash image) in this page Download section.
2. connect to your VoCore hotspot, open browser view 192.168.1.1 or 192.168.61.1.
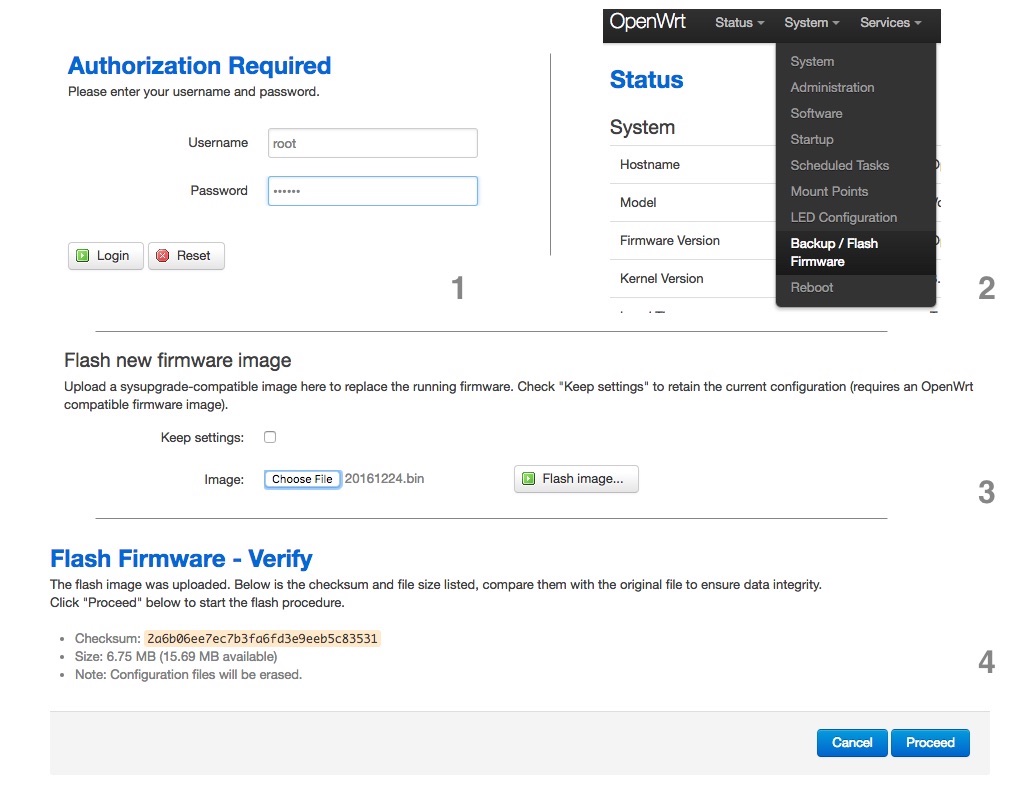
3. LuCI console using username: root, password: vocore, click on "Login" (picture part 1).
4. select "System" -> "Backup/Flash Firmware" (picture part 2).
5. click on "Choose File", choose your downloaded firmware(again, not the flash image, picture part 3), then click "Flash Image".
6. it will upload the firmware to your VoCore2, takes a few seconds, check if the md5 matched. (picture part 4)
7. if everything ok, press "Process".
8. normally it will take 2~3 minutes, please wait until it is ready.
note: if power cut off during the upgrade process, your VoCore2 will brick, check "Fix Bricked VoCore2"
video tutorial: youtube
text tutorial: Github
1. install Ubuntu 14.04 64bit Server(or later version) to Virtual Machine(2GB memory, 20GB disk space).
2. in virtualbox, we will need install some packages to compile openwrt:
sudo apt-get install gcc g++ binutils patch bzip2 flex bison make autoconf gettext texinfo unzip sharutils subversion libncurses5-dev ncurses-term zlib1g-dev libssl-dev gawk
3. download openwrt, check github.com/vonger/vocore2 README.md
4. call "make menuconfig" in the openwrt folder, configure openwrt in menu, choose MT7688/28/VoCore2 in menu.
5. call "make" in the openwrt folder, start the make process
note: for full tutorials, please check Beginner Tutorials
1. compile openwrt for VoCore2, it will create toolchain or download it at Downloads/Toolchain(for Ubuntu 14.04 64bit).
2. make a simple code in C, compile it in command line.
/path.to.your.toolchain/bin/mipsel-openwrt-linux-gcc -g yourcode.c -o yourcode
3. after this, you will get an executable file named "yourcode", use scp, copy it to your VoCore2
4. in VoCore2, call chmod +x yourcode, after that, you can run it in VoCore2, call ./yourcode
note: setup a develop environment, please check Develop and Debug on Qt Creator
1. upload firmware through luci, please read "Upgrade Firmware" section.
2. upload firmware through console, connected to VoCore hotspot.
(1) copy from pc to VoCore[operate in PC]: scp [your firmware].bin root@192.168.61.1:/tmp/vocore2.bin
here is two choices, 2.a will erase all data/config you write to VoCore, 2.b just upgrade the firmware but keep them.
(2.a) write to VoCore nor flash[operate in VoCore]: mtd -e firmware write /tmp/vocore2.bin firmware
(2.b) system upgrade VoCore nor flash[operate in VoCore]: sysupgrade /tmp/vocore2.bin firmware
(3) wait until mtd done, reboot your VoCore.
note: if you want set your VoCore back to first time boot up, call "firstboot" in console.
1. connect your VoCore2 to computer through USB2TTL(UART2 RXD2+TXD2+GND).
2. open tty tools(must have kermit protocol), such as kermit, ckermit, teraterm.
3. power up your VoCore, once you find: "0: Load system code then write to Flash via SERIAL.", press '0'.
note: VoCore will show "## Ready for binary (kermit) download to 0x80100000 at 115200 bps..."
note: kermit: press Ctrl and '\' same time then press 'c', you will switch to kermit command console.
4. use kermit send function in teraterm/ckermit.
5. send upgrade firmware to VoCore, after that, back to VoCore uboot console.
note: kermit: call "send path/to/your/upgrade/file/on/pc.bin" to send firmware, around 10 minutes, once it finished, call 'c' back to console.
6. wait around 20~30 seconds, firmware uploaded, your VoCore will reboot.
1. You must have another VoCore/VoCore2 or one flash loader and six wires.
2.1 using another VoCore/VoCore2 to recover your bricked VoCore2.
2.1 check blog https://vonger.cn/?p=8054.
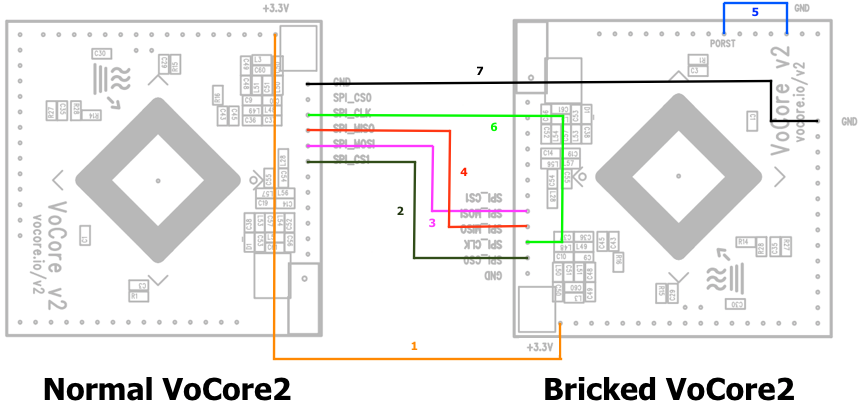
2.2 using flash loader to recover your bricked VoCore2.
2.2.a disconnect VoCore2 from power;
2.2.b connect VoCore2 GND to flash loader GND;
2.2.c VoCore2 +3.3V to flash loader +3.3V;
2.2.d VoCore2 SPI MISO -> flash loader SPI MISO;
2.2.e VoCore2 SPI MOSI -> flash loader SPI MOSI;
2.2.g VoCore2 SPI CS0 -> flash loader SPI CS;
2.2.h VoCore2 SPI CLK -> flash loader SPI CLOCK;
2.2.i VoCore2 RST -> VoCore2 GND; (keep VoCore2 in reset mode)
note: if not work, swap MISO/MOSI.
2.2.j now, download then send "Flash Image" to VoCore2.2.
2.2.k remove wires, connect VoCore2 back to power, everything should back normal.
3. option: better to upgrade your firmware after recover, Flash Image is out of date.
note: if you want set your VoCore back to first time boot up, call "firstboot -y" in console.
On VoCore2 standard version we have another antenna, default it is power off status(to avoid two antenna cross-talk to each other), if you have a external U.FL antenna, you can connect it to VoCore2, convert it from a portable router to a full function 802.11n router, maxmize its speed and signal strength.
note: suggest distance between two antennas is > 6cm
1. download a factory setting read/write tool to /tmp/ on VoCore, chmod +x /tmp/ant*.
2. we run the following script to enable second antenna.
enable second antenna:
sh /tmp/ant2.sh
disable second antenna:
sh /tmp/ant1.sh
3. call firstboot -y(all your setting will lost!), then reboot.
Sometimes, we might mess the factory setting section on VoCore2 flash(address can be find by "cat /proc/mtd"), that will cause wifi driver failed to start. To recover it, we need the following steps:
1. get into VoCore console, by ehternet or serial port(TTL).
2. copy mt7628.sh to your VoCore2 /tmp, or directly copy the txt in the script and run in console.
3. run mt7628.sh by "sh /tmp/mt7628.sh", then reboot.
note: your mac address will be fixed to b8:d8:12:67:01:73, you can change this to modify your VoCore2 mac address.
1. reboot vocore2 at serial console, check "Connect to VoCore through USB2TTL"
2. once reboot, it will show "7: Load Boot Loader code then write to Flash via Serial.", now we are ready to send the data.
3. use kermit or compatible tools send uboot.bin, uboot.bin can be get from from Download section.
4. wait until it reboot.
We made a simple tool for this, download here, its name is "mem", put the executable file into /bin/ in VoCore2.
0. make sure your firmware has /dev/mem, for secure reason, it is disabled for default openwrt compile.
1. read from register/memory, for example: 0x10000060, pin control register
example: mem 0x10000060
2. write to register/memory, must in 32bits(4bytes)
example: mem 0x10000064 0x05540555
here is an example bash script flash the LED every second on VoCore2
mem 0x10000064 0x05540555; mem 0x10000604 0x1000; while [ 1 ]; do mem 0x10000634 0x1000; sleep 1; mem 0x10000644 0x1000; sleep 1; done
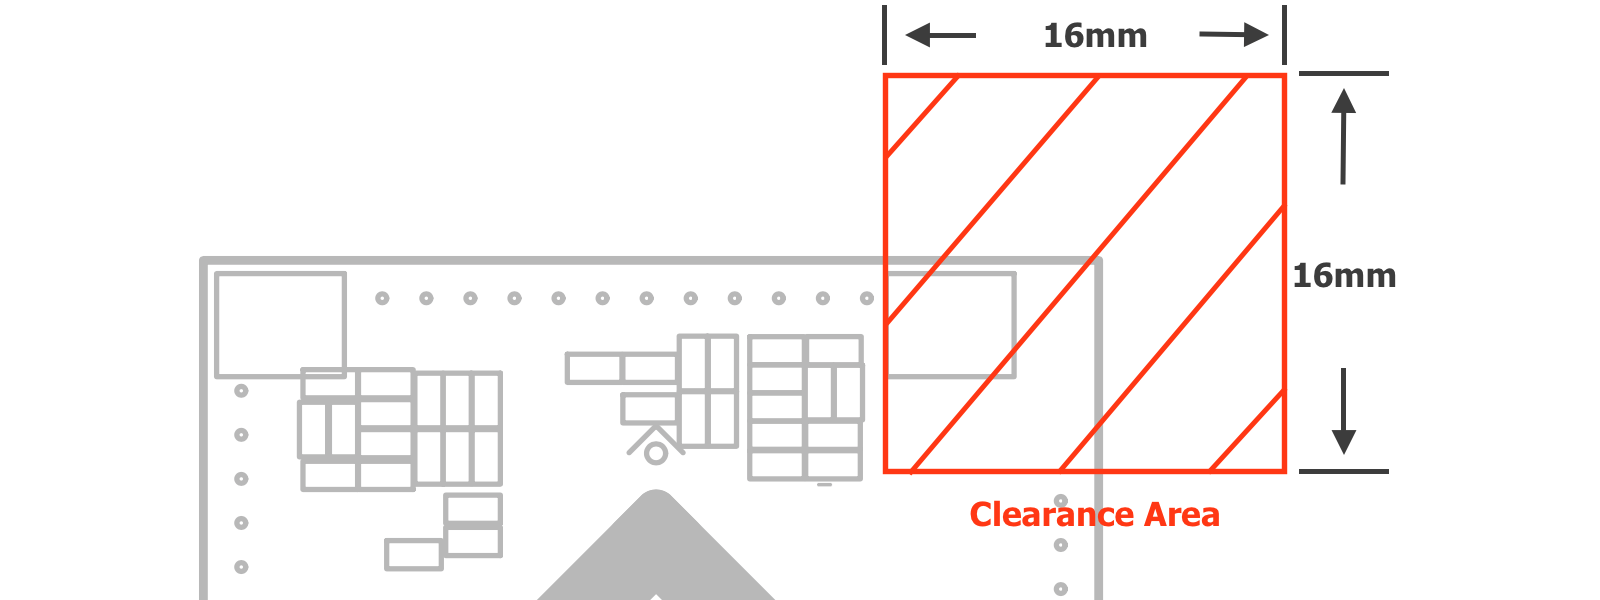
1. on customized PCB, suggest keeping 16mm x 16mm rectangle clearance(no copper) for better signal on board antenna.
2. suggest using hot air instead of iron, DDR2 is a ESD sencetive part, some iron leak current might cause permanent damage.
3. suggest reflow 260C max 10 seconds, longer might cause damage to VoCore.
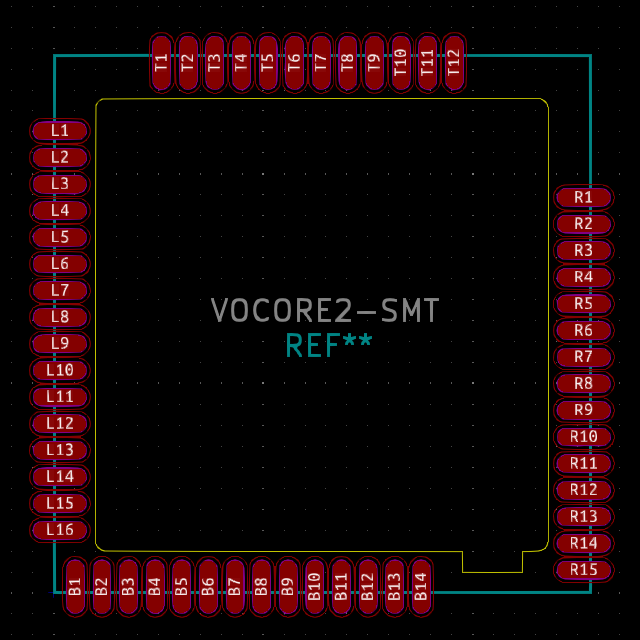
4. in order to use castle hole on VoCore, milling a hole(the yellow border in second picture) on your mount board is necessary. Check Sources/SMT Mount Footprint for KiCAD file.
5. before SMT, make sure you bake VoCore2 at 120C at least 12 hours.
6. recommend, please remove the mac address tag on main chip, add heatsink.
7. one package contains 1120pcs, please use them in 6 months, and stock in cool/dry place without package opened.